About Me

- ebilfairy
- Hi I'm Sandra (also go by ebilfairy) I'm 38. Living with my parents, younger sister, her daughter Bella and one dog called Kiki.
Sunday, 13 May 2012
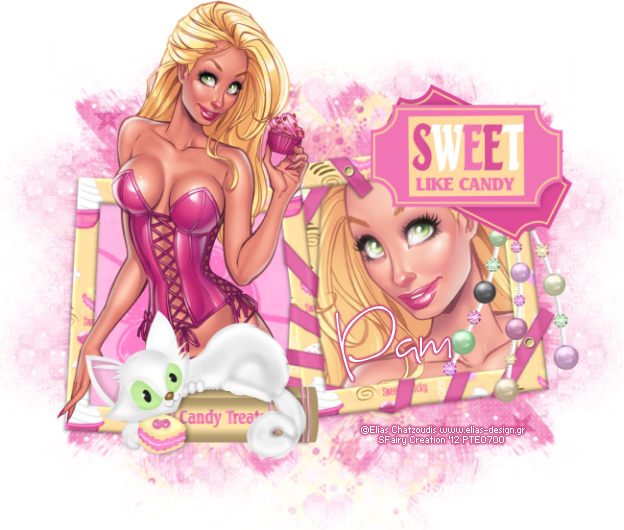
FTU Tutorial - Sweet Like Candy
This tutorial was written by me on 13th May 2012 any resemblance to other tutorials is a coincidence.
*****
Supplies
FTU scrapkit by Kittz called Candy Treats
Tube of Choice I'm using the art of Elias Chatzouids, you must have a license to use his art. You can purchase his tubes at Elias Art Shop
(I bought my tubes while he was at PTE which has now closed)
(I bought my tubes while he was at PTE which has now closed)
Font of choice.
Mask of choice
(I know I hate when people say that but I really can't remember what masked I used sorry but I think it was a Vix Mask)
*****
Lets Get Going
Open a new canvas 650 x 650
Selections - Select All - Paste CT-P4 Into Selection
Layers - New Mask Layer - From Image
Find your mask in the drop down box.
Paste CT-Sweet Double Frame as a new layer - resize 90%
Magic Want Tool click inside the right side of the frame - Selctions - Modify 5
Paste your close up tube as a new layer- positing so something you like is showing in the frame.
Selections - Invert - Press the small delete key to remove tube outside frame.
Selections - Select None.
Layers - Arrange - Move Down.
Duplicate the tube layer - Adjust - Blur - Gaussian Blur 3 - Blend mode - Opacity 80%
Magic Wand Tool click inside the left side of the frame.
Selections - Modify 5
Paste CT-P3 as a new layer - Selections - Invert - Press the small delete key.
Layers - Arrange - Move Down.
Paste main tube as a new layer - Dupliacate
Layers - Arrange - Move Up
Selections - Invert - Press the small delete key (on the original tube)
Selections - Select None
On the duplicate tube use the eraser tool to remove the bottom half so it looks like the tube is coming out of the frame.
Merge Visible
Add any elements you like. I added
CT-Pearls
f3 resize 75%
CT-Sweet Kitty 50%
Resize
Add your name & copyright info
Save as png.
FTU Tutorial - So Punked Off!

This tutorial was written by me on 13th May 2012 any resemblance to other tutorials is a coincidence.
*****
Supplies
FTU Scrapkit by Kittz called So Punked Off!!!!
Tube of choice I'm using the art of Zlata M you must have a license to use this tube. You can purchase it at PicsForDesign
Font P22 Sniplash
*****
Lets Get Going
Open a new canvas 650 x 650
Paste SPO-Frame2 as a new layer - resize 90%
Magic Wand Tool - click inside the frame
Selections - Modify - Expand 5
Layers - New Raster Layer - Floodfill #000000
Layer - Arrange Move Down
Paste tube as a new layer
Selections - Invert - Press the small delete key to remove excess tube.
Selections - Select None
Duplicate the tube layer - Image Mirror.
Layers - Merge - Merge Down - Change the blend mode to Luminance(Legacy)
Effects - Artistic Effects - Half Tone

Paste tube as a new layer - Move to the top of the frame - Resize to liking.
Layers - New Raster Layer
Selection - Select All - Paste 09paper Into Selection.
Layers - Arrange - Move Down
Layers - New Mask Layer - From Image
Use the Deform to get the mask how you like it.
Layers - Merge - Merge Visible
Resize to liking.
Add your name & copyright info.
Save as png.
FTU Tutorial - Angelic

This tutorial was written by me on 13h May 2012 any resemblance to other tutorials is a coincidence.
*****
Supplies
FTU scrapkit by Kittz called Angel Kisses
Tube of choice I used the art of Ellie Milk you can must have a license to use this tube,
You can purchase it at PicsForDesign
Font Fontdinerdotcom Sparkly
*****
Lets Get Going
Open a new canvas 650 x650
Paste GB-Square Scalloped Frame as a new layer.
Magicwand click inside the frame.
Selections - Modify - Expand by 5.
Paste GB-P7 as a new layer.
Layers - Arrange - Move Down.
Selections - Invert - Press the small delete key to remove paper outside of frame.
Paste your tube as a new layer - If your using the same tube as me I resized 75%
Duplicate tube - Layers - Arrange Move up.
Back on the original tube press the small delete key.
Selections - Select None.
On the duplicate layer - use the eraser tool to remove the bottom part of the tube.
(should look like she's coming out of the frame now)
Paste GB-Sparkles as a new layer - resize 90%
Paste GB-Heart String as a new layer - resize 85%
Paste gGB-Angelic Brad with Wings as a new layer - resize 65% - Image - Free Rotate 10% left.
Layers - Merge - Merge Visible.
Layers - New Raster Layer.
Selections - Select All
Paste GB-P14 into selection
Selections - Select None
Layers - Arrange - Move Down
Layers - Load Mask From Image find Vix_Mask178 in the dropdown box.
Layers - Resize 80%
Move down to the left - Duplicate - Image Flip - move to the right.
Layers - Merge - Merge Down - Lower the opacity to 50%
Repeate the Mask steps using GB-P10 (mirror when finished)
Add your name & copyright info
Save as png
Subscribe to:
Posts
(Atom)
My Blinkie

I CT For


