About Me

- ebilfairy
- Hi I'm Sandra (also go by ebilfairy) I'm 38. Living with my parents, younger sister, her daughter Bella and one dog called Kiki.
Showing posts with label Keith Garvey. Show all posts
Showing posts with label Keith Garvey. Show all posts
Monday, 1 July 2019
IB-SybileArtJune2019-bt - CT Timeline Set


Thursday, 8 November 2018
IB-KeithGarvey-5-1 - CT Tag


Wednesday, 20 June 2018
Beachy Keen CT Timeline Set & Tags
CT Dees'Sign Depot
Timeline Set & Tags made with Dee's gorgeous Beachy Keen Bundle.
You can buy the Beachy Keen Bundle at Dees'Sign Depot HERE.
You can buy the bundle parts separately if you like.
Cluster Frames HERE.
Clusters HERE.
Scrapkit HERE.
Tubes by Ellie Milk, Keith Garvey & Zlata M.


Here is a Wallpaper I made with the kit.
Right click -open in a new window, then right click save.

Wednesday, 14 February 2018
I Truly Do CT Tags & Timeline Set


Tuesday, 24 January 2017
Crazy For You CT Tags & Timeline Set
CT Dees'Sign Depot
Tags & Timeline Set made using Dee's beautiful collab kit with Sophisticat Simone.
The collab is called Crazy For You.
You can buy the kit at Dees'Sign Depot HERE.
Tubes by Nocturne, Keith Garvey & Zlata M.


Thursday, 14 April 2016
CT Tag & Timeline Set - Cherish


Friday, 19 June 2015
CT Timeline Set - IB JenniferJanesko 69-3


Saturday, 5 April 2014
PTU Tutorial - Bad Girl

This tutorial was written by me on 5h of April 2014 any resemblance to other tutorials is a coincidence.
*****
*Supplies*
*Supplies*
PTU Scrapkit Dark Girl by P-O Concept here.
Tube by Keith Garvey - you must have a license to use this tube you can purchase it here.
Vix-MaskHalloween2012-4 here.
zuzzanna_mask43 here.
Font LeviBrush
****
*Lets Get Started*
*Lets Get Started*
File - New - New Canvas 650x650
*
Selections - Select All.
Copy PO-bapp6 - Paste - Paste Into Selection.
Selections - Select None.
Layer - New Mask Layer for Image.

Layers - Marge - Merge Visible.
*
Layers - New Raster Layer.
Selections - Select All.
Copy PO-bapp6 - Paste - Paste Into Selection.
Selections - Select None.
Layer - New Mask Layer for Image.

Layers - Merge - Merge Visible.
*
Copy PO-da86 - Move up and to the left.
(see my tag for placement)
Layers - Duplicate - Image - Mirror - Image - Flip.
*
Copy PO-da20 - Paste - Paste As New Layer.
Magic Wand Tool - Click inside both sides of the frame.
Selections - Modify - Expand by 5.
*
Copy PO-bapp3 - Paste - Paste As New Layer.
Image - Resize 70%
Layers - Arrange - Move Down.
*
Selections - Invert - Press the small delete key.
(should remove paper outside the frame)
*
Copy your close up tube - Paste - Paste As New Layer.
Move tube so that what you like is showing inside the frame.
Press the small delete key.
Selections - Select None.
Layers - Duplicate - Image Mirror.
*
Layers - Merge - Merge Down.
(Both close up tube layers should be on one layer now)
Change the blend mode of this layer to Luminance Legacy.
Layers - Duplicate.
Adjust - Blur - Gaussian Blur 2.
Change the blend mode to overlay - lower the opacity to 70%.
*
Close off the frame layer.
Layers - Merge - Merge Visible.
Effects - Texture Effects - Blinds

*
Open up the frame layer again.
Copy PO-da34 - Paste - Paste As New Layer
Image - Resize 50%
Move to the left side of the frame.
Layers - Duplicate - Image - Mirror.
Layers - Merge - Merge Down.
Layer - Duplicate - Change the Blend Mode to Multiply.
*
Move to your frame Layer.
Copy your tube - Paste - Paste As New Layer.
Place where you think it looks best.
*
Elements
PO-da42 - 70%
PO-da28 - 70%
PO-da29 - 70%
PO-da15 - 20% - Image - Rotate 10 left.
PO-da27 - 40% - Rotate 10 left.
PO-da37 - 50%
*
Add your copyright and name.
Resize to liking and save as png.
Sunday, 15 April 2012
FTU Tutorial - Sweetheart
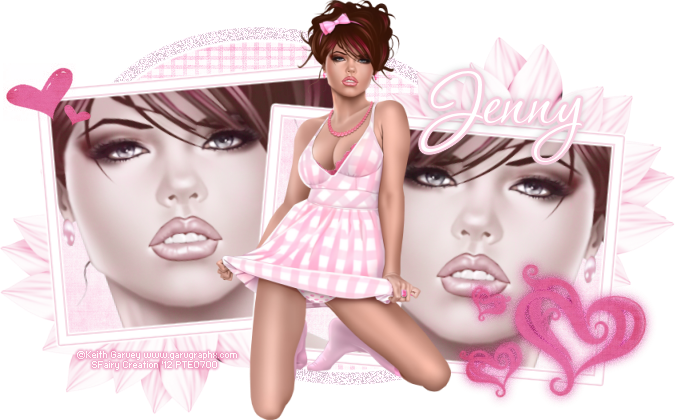
This tutorial was written by me on 15th April 2012 any resemblance to other tutorials is a coincidence.
*****
Supplies
Tube of choice I used the gorgeous art of Keith Garvey here.
Template116 by Rachel at Scraps of Enchantment
Scrapkit is FTU by Jenny's Designz it's called Sweetheart.
Font of choice.
*****
Lets Start
Open templat116 in PSP - press SHIFT+D to duplicate it - close off the original.
Delete the copyright layer.
OvalBackground
Selections - Select All - Float - Defloat
Paste Paper7 into selection
Selections - Select None.
OvalFrame
Copy & paste Flower1 as a new layer
Resize 50% then 50% again.
See my tag for placement.
Duplicate Flower1 - Image - Mirror - Flip
BackgroundRight
Selections - Select All - Float - Defloat
Paste paper6 as a new layer
Paste paper6 as a new layer
Image - Resize 30% - 50%
Copy & paste your close up tube as a new layer.
Selections - Invert - press the small delete key on the paper & tube layers.
(this removes the excess stuff outside the frame)
Selections - Select None
Duplicate the tube
On the original layer change the blend mode to Luminance(Legacy)
Blend mode of the duplicate tube Screen & lower the opacity to 70%
BackgroundLeft
Repete the steps you used for BackgroundRight
HeartBrush1
Selections - Select All - Float - Defloat
New Raster Layer - Paste paper10 into selection
Delete HeartBrush1 - Selections - Select None
HeartBrush2
Repeat the steps used for HeartBrush1
Copy & paste your tube as a new layer. Resize to your liking.
Layer - Merge - Merge Visible
Add your name - copyright and any other elements you like.
Subscribe to:
Posts
(Atom)
My Blinkie
I CT For