About Me

- ebilfairy
- Hi I'm Sandra (also go by ebilfairy) I'm 38. Living with my parents, younger sister, her daughter Bella and one dog called Kiki.
Shout Out
Followers
Friday, 30 September 2011
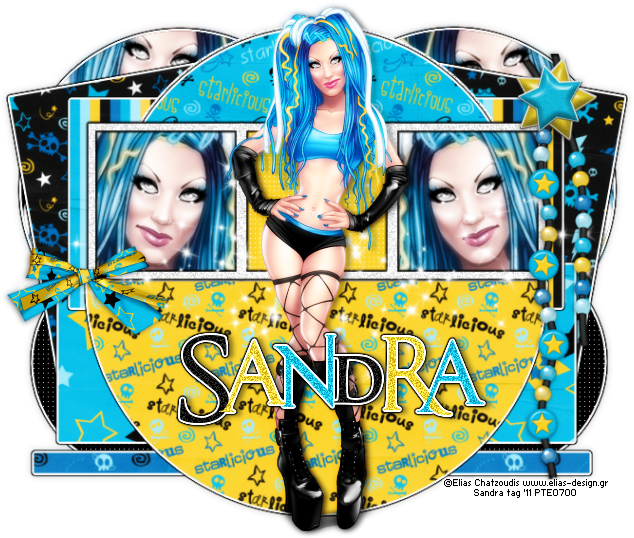
FTU Tutorial - Starlicious

This tutorial was written by me on 25th September 2011
*Supplies*
Tagtemplate 382 from Missy at Divine Intentionz
Scrapkit Starlicious by Krstin at Toxic Desirez
Tube Elias Chatzouids - you must have a license to use his work.
You can buy Elias tubes at Elias Art Shop
Font An Unfortunate Event
Plugins
Eye Candy 4000 - Gradient glow
*****
*Lets Get Going*
Open template 382 in PSP - press shift+D to duplicate it and close off the original.
Delete copyright - dotted line - wordart - wordart back - raster 3 shadow and background.
Image - Canvas Size 700x600.
I'll be going from bottom to top.
Raster 2
Selections - float - defloat
Copy & paste your close up tube as a new layer. Position so that what you want is showing inside the circle.
Selections - Invert. Press the small delete key on your keyboard.(that should delete the excess tube)
Selections - select none.
Layers - duplicate. Adjust - blur - Gaussian Blur 3.
Change the top tube blend mode to Overlay.
Back on Raster 2 - Effects - Eye Candy 4000 - Gradient Glow
Copy of Raster 2
Repeat all the steps we used for Raster 2
small circle & small circle2
Effects - Texture Effects - Weave
Effects - Eye Candy 4000 - Gradient Glow same settings as before.
thin rectangle
Selections - Float - Defloat
Copy & Paste a paper 12 as a new layer.
Selections - Invert - press the small delete key on your keyboard.
Selections - select none.
Effects - Gradient glow same settings as before.
Delete the original rectangle layer.
square
Selections - select all - float - defloat
Copy & paste paper16 as a new layer - resize 80%
Selections - Invert - press the small delete key.
Selections - select none.
Effects - Eyecandy Gradient Glow same settings as before.
Delete the original square layer.
Copy of square
Follow all the steps we used for square but use paper 11 instead of 12
rectangle
Selections - Select All - Float - Defloat
Copy & Paste paper 18 as a new layer - resize 80%
Selections - Invert - press the small delete key.
Effects - Gradient Glow
rectangle2
Selections - Select All - Float - Defloat
Copy & Paste paper 21 as a new layer - resize 80%
Selections - Invert - press the small delete key.
Effects - Gradient Glow same settings as before.
circle
Selections - Select All - Float - Defloat
Copy & Paste paper 8 as a new layer - resize 80%
Selections - Invert - press the small delete key.
Effects - Gradient Glow same settings as before.
half circle
Selections - Select All - Float - Defloat
Copy & Paste paper 10 as a new layer - resize 80%
Selections - Invert - press the small delete key.
Effects - Gradient Glow same settings as before.
Raster 1
With your magic wand click inside the left black square
copy & paste your close up tube as a new layer
Selections - Invert - press the small delete key.
Duplicate the tube - Image mirror & move it so that it sits inside the frame.
Merge the 2 tube layers together and then dupliacte again.
Adjust - Blur - Gaussian Blur - 3
Change the blend mode on the originals 2 Luminance (Legacy)
On the duplicate tube layer change the blend mode to overlay.
Raster 1
Click inside the middle pink square.
Adjust - Color Balance - Manual Color Correction
source #d92d8c - target #fbd135
Effects - Texture Effects - Weave
Selections - Select None
Frame
Adjust - Add/Remove Noise - Add Noise
Uniform 50 - Monochrome checked.
Effects - Gradient Glow
Copy & paste Starlicious Sparkles as a new layer
Copy & paste Bow 1 as a new layer - resize 50% - drop shadow - see tag for placement.
Copy & paste Beaded String as a new layer - resize 80% - dropshadow - see tag for placement.
Copy and paste Star 2 as a new layer - resize 50% - dropshadow - see tag for placement.
Copy & paste Star 1 as a new layer - Mirror - resize 45% - see tag for placement.
To make my tag brighter I merged layers visible - Resize 95%
Duplicated the whole tag.
Adjust - Blur - Gaussian Blur 3.
Change the blend mode to overlay & lower the opacity to 40%
If you don't want to do all that just - Merge Visible and resize 95%
Copy & paste your main tube as a new layer - position where you think it looks best.
Dublicate - Adjust - Blur - Gaussian Blur 3 - change the blend mode to overlay.
Add a drop shadow to the original tube layer
v0 - H2 - O30 - B5
Crop your canvas - add copyright and name.
Labels:Elias Chatzoudis,FTU Tutorial
Subscribe to:
Post Comments
(Atom)


0 comments:
Post a Comment