About Me

- ebilfairy
- Hi I'm Sandra (also go by ebilfairy) I'm 38. Living with my parents, younger sister, her daughter Bella and one dog called Kiki.
Showing posts with label Bits N Bobs. Show all posts
Showing posts with label Bits N Bobs. Show all posts
Friday, 17 January 2014
FTU Tutorial - Sweet Cupid

This tutorial was written by me on 17th of January 2014 any resemblance to other tutorials
is a coincidence.
*****
*Supplies*
Scrapkit by Vaybs you can download it on her blog here.
Tube by Bits N Blobs - you must have a license to use this tube.
You can purchase it here.
Mask by Aqua you can download it & a lot more masks here.
Font of choice I used Jellyka - Love and Passion.
***
*Lets Get Started*
File - New - New File 650x650
Selections - Select All.
Copy paper of choice (I used 13) - Paste As New Layer.
Selections - Select None.
Layers - New Mask Layer - From Image.
Find your mask in the dropdown box.
Layers - Merge - Merge Group.
I lowered the opacity to 50 but you can leave as if you like.
Copy DBV Valentine Collab frame - Paste As New Layer.
Image - Resize 80% smartsize.
Magic Wand Tool - click inside the frame.
Selections - Modify - Expand by 10
Copy paper of choice (I used 3) - Paste As New Layer.
Selections - Invert - Press the small delete key on the keyboard.
Selections - Select None.
Layers - Arrange - Move Down.
Back on the frame layer.
Copy DBV Valentine Collab element (12) - Paste As New Layer.
Image - Resize 80%.
Move to the left of frame.
Copy DBV Valentine Collab element (11) - Paste As New Layer.
Image - Resize 80%.
Image - Rotate - Free Rotate 10 degrees right.
Copy DBV Valentine Collab element (14) - Paste As New Layer.
Image - Resize 80%.
Image - Rotate - Free Rotate 10 degrees left.
Copy DBV Valentine Collab element (5) - Paste As New Layer.
Image - Resize 50%.
Move to top right of frame.
Copy your tube - Paste As New Layer.
Resize to you liking.
If you want to make it look like she is sat inside the frame follow these steps.
1. Click inside the frame with the Magic Wand Tool - Selections - Expand by 10.
2. On the tube layer - Selections - Promote Selection to layer.
Selections - Select None.
3. Layers Arrange - Move Down x 5 (so it's on the layer below the frame)
4. Back on the full tube layer - Eraser Tool - Remove any of the tube outside the frame.
Copy DBV Valentine Collab WA (6) - Paste As New Layer.
Move down to bottom of tag.
Add the tube copyright and your name.
Save as png or JPEG.
Monday, 18 March 2013
FTU Tutorial - Hoppy Easter

This tutorial was written by me on 18th of March 2013 any resemblance to other tutorials is a coincidence.
*****
*Supplies*
Scrapkit by Vaybs called Easter 2010
Tube of choice I'm using one called Brunnella by Bits N Bobs.
You must have a license to use this tube which you can purchase at PicsForDesign.
RR_SpringEaster Mask5 here
Font of choice I used Good Vibrations
*****
*Lets Get Started*
Open a new blank canvas 650x650
Floodfill with a color of choice I used #fad058
Layers New Mask Layer - From Image
Find RR_SpringEaster Mask5 in the dropdown box
Layers - Merge - Merge Group
Copy DBV Easter 2010 element (17) & Paste As A New Layer
Image - Resize 90%
Copy DBV Easter 2010 element (18) & Paste As New Layer
Copy DBV Easter 2010 frame (3) & Paste As New Layer
Image - Resize 80% smartsize
Magic Wand Tool - Click inside the frame - Selections - Modify - Expand 5
Copy DBV Easter 2010 paper (5) & Paste As New Layer
Selections - Invert - Press the small delete key.
Copy your close up tube - Press the small delete key
Selections - Select None
Duplicate the tube layer.
On the original tube - change the blend mode to Luminance(Legacy)
On the duplicate tube layer - Adjust - Blur - Gaussian Blur 3
Change the blend mode to Screen - Lower the opacity to 80%
Hide Mask - element (17) & element (18) layers
Layers - Merge - Merge Visible.
Image - Roate - Free Rotate Left 20
Effects - Image Effects - Offset

Effects - Image Effects - Offset

Copy DBV Easter 2010 element (15) & Paste As New Layer
Image - Resize 60% smartsize
Effects - Image Effects - Offset
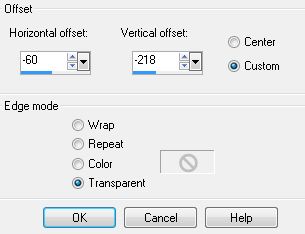
Layers - Duplicate
Effects - Image Effects - Offset

Copy DBV Easter 2010 element (4) & Paste As A New Layer
Image - Resize 60% smartsize
Effects - Image Effects - Offset

Copy your tube & Paste As A New Layer
Resize to your liking & Move where you think it looks best.
Unhide Mask - element (17) & element (18) layers
Add copyright & your name.
Layers - Merge - merge Visible
Sunday, 17 March 2013
FTU Tutorial - Brattitude

This tutorial was written by me on 17th of March 2013 any resemblance to other tutorials is a coincidence.
*****
*Supplies*
DBV Misfit template02 by Vaybs
Scrapkit Brattitude by Vaybs
Mask 107 by Vaybs
Tube of choice I'm using one called Daniella by Bits N Bobs.
You must have a license to use this tube which you can purchase at PicsForDesign.
Tube of choice I'm using one called Daniella by Bits N Bobs.
You must have a license to use this tube which you can purchase at PicsForDesign.
*****
*Lets Get Started*
Open template in PSP - press shift + D to duplicate it - close off original.
Image - Resize 90%

Image - Canvas size 650x650
Delete Raster 11
Raster 1
Selections - Select All
Layers - New Raster Layer
Copy DBV Brattitude paper (3) & Paste Into Selection
Selections - Select None
Layers - Arrange - Send to Bottom
Layers - New Mask Layer - From Image

Layers - Merge - Merge Group
Layers - Duplicate - Image - Mirror - Image - Flip
(close off for now)
Copy of Raster 9
Layers - Merge - Merge Down
Selections - Select All - Float - Defloat
Copy DBV Brattitude paper (15) - Paste As New Layer
Selections - Invert - Press the small delete key
Selections - Select None
Delete the original layer
Copy of Raster 10
Layers - Merge - Merge Down
Selections - Select All - Float - Defloat
Copy DBV Brattitude paper (17) - Paste As New Layer
Selections - Invert - Press the small delete key
Selections - Select None
Delete the original layer
Copy of Raster 4
Layers - Merge - Merge Down
Selections - Select All - Float - Defloat
Copy DBV Brattitude paper (17) - Paste As New Layer
Selections - Invert - Press the small delete key
Selections - Select None
Delete the original layer
Raster 5
Selections - Select All - Float - Defloat
Copy your close up tube & Paste As New Layer
Selections - Invert - Press the delete key
Selections - Select None
Duplicate the tube layer
Change the blend mode of the original tube layer to Luminance(Legacy)
On the duplicate tube layer
Adjust - Blur - Gaussian Blur 3
Change the blend mode to Overlay - Lower the opacity to 70%
Copy of Raster 5
Selections - Select All - Float - Defloat
Mirror your close up tube - Copy & Paste As New Layer
Selections - Invert - Press the delete key
Selections - Select None
Duplicate the tube layer
Change the blend mode of the original tube layer to Luminance(Legacy)
On the duplicate tube layer
Adjust - Blur - Gaussian Blur 3
Change the blend mode to Overlay - Lower the opacity to 70%
Raster 7
Selections - Select All - Float - Defloat
New Raster Layer
Floodfill with a gradient
Foreground #f5afcb
Background #8ab2bc

Delete Raster 7
Raster 8
Adjust - Color Balance - Manual Color Correction
Source #000000
Target #ffffff
Copy of Raster 7
Selections - Select All - Float - Defloat
New Raster Layer
Floodfill with a gradient (same as before but switch foreground & background)
Foreground #8ab2bc
Background #f5afcb
Delete Copy of Raster 7
Copy of Raster 7
Adjust - Color Balance - Manual Color Correction
Source #000000
Target #ffffff
Raster 3
Selections - Select All - Float - Defloat
Copy DBV Brattitude paper & Paste As New Layer
Selections - Invert - Press the small delete key
Selections - Select None
dotted circle
Copy your tube & Paste As New Layer
Add dropshadow of choice.
Raster 2
Adjust - Add/Remove Noise - Add Noise

Add Elements of Choice
I used
DBV Brattitude element (42) resize 80%
DBV Brattitude element (28) resize 50%
DBV Brattitude element (31) resize 60%
DBV Brattitude element (9) resize 40%
Open up your mask layers & move around to your liking (or delete it's up to you)
Add copyright & name
Layers - Merge - Merge Visible
Save as png.
Wednesday, 13 March 2013
FTU Tutorial - Happy Easter


This tutorial was written by me on 13th of March 2013 any resemblance to other tutorials is a coincidence.
*****
Supplies
Paper of choice I used paper10 from Have A Hoppy Easter by Teresa
download at Creative Misfits Creations.
Tube of choice I'm using one called Brunnella by Bits N Bobs.
You must have a license to use this tube which you can purchase at PicsForDesign.
Fonts Impact, Janda Happy Day, Gabrielle.
My selection here.
(download & place in your selections folder)
Plugins
L en K Zita
*****
Lets Get Started
New Canvas 620x210
Copy paper 10 & Paste As New Layer
Copy tube & Paste As New Layer
Move to the left of your canvas
Layers - Duplicate - Image - Mirror
Layers - Merge - Merge Down
Layers - Duplicate - Adjust - Blur - Gaussian Blur 5
Change the blend mode to Screen - Lower Opacity to 60%
On the original tube layer change the blend mode to Overlay.
Layers - Merge - Merge Visible
Selection Tool - Custom Selections

Effects - Plugins - L en K Zitah - Default Settings.
Selections - Select None.
Selections - Load/Save Selections - Load Selection From Disk
Find Sans Happy Easter Selection - with these settings.

New Raster layer - Floodfill with #ffffff
Selections - Select None - Lower the opacity to 50%
Font of choice I used Impact size 24 & typed Happy Easter.
Image - Rotate - Free Rotate 90 Left
(use your Deformation tool to stretch the text to your liking)
Change your font to a Janda Happy Day size 18 type type Happy Easter again.
Image - Rotate - Free Rotate 90 Left
Effects - 3D Effects - Drop Shadow

Layers - Merge - Merge Visible
Copy your tube & Paste As New Layer
Resize 80% smartsize - move to the center of your canvas
(or where you think looks best)
Layers - Duplicate - Adjust - Blur - Gaussian Blur 3
Change the blend mode to Soft Light.
Shift D to make a duplicate(close off for now)
Layers - New Raster Layer
Selections - Select All
Floodfill with #ffffff
Selections - Modify - Contract 5
Selections - Select None
Adjust - Add/Remove Noise - Add Noise

New Raster Layer
Selections - Select All Float
Floodfill with #b997c4
Seelctions - Modify - Contract 3
Effects - Texture Effects - Weave

Add your copyright & name.
Save as JPEG.
Avatar
Open a new canvas 135x150
Open up the copy of the duplicated tag, copy & Paste as New Layer
Move it around until you have something you like showing inside the avatar frame.
Layers - New Raster Layer
Floodfill with #ffffff
Selections - Modify - Contract 5
Selections - Select None
Adjust - Add/Remove Noise - Add Noise
Same settings as before.
New Raster Layer
Selections - Select All Float
Floodfill with #b997c4
Selections - Modify - Contract 3
Effects - Texture Effects - Weave
Same settings as before.
Layers - Merge - Merge Visible
Add your copyright & Name or Initial.
Save as JPEG
FTU Tutorial - Happy Easter

This tutorial was written by me on 13th of March 2013 any resemblance to other tutorials is a coincidence.
*****
Supplies
Template 9 by Missy Divine Intentionz.
Scrapkit called Have A Hoppy Easter by Teresa - download at
Creative Misfits Creations.
Tube of choice I'm using one called Brunnella by Bits N Bobs.
You must have a license to use this tube which you can purchase at PicsForDesign.
Mask RR_SpringEaster Mask5 - download from Creative Misfits Creations.
Font Gabrielle.
*****
Lets Get Started
Delete the copyright & background layers.
Image - Canvas Size 650x650.
New Raster Layer
Selections - Select All
Paste a paper of choice Into Selections (I used paper 8)
Selections - Select None
Layers - New Mask Layer - From Image

scallope shape
Selections - Select All - Float - Defloat
Copy a paper of choice (I used paper10) & Paste As New Layer.
Selections - Invert - Press the small delete key to remove paper outside the shape.
Selections - Select None
Delete the scallope shape.
Effects - Plugins - EyeCandy400 - Gradient glow
 thin rectangle
Selections - Select All - Flaot - Defloat
Copy a paper of choice (I used paper11) & Paste As New Layer.
Selections - Invert - Press the small delete key to remove paper outside the shape.
Selections - Select None
Delete the thin rectangle layer.
Effects - Plugins - EyeCandy400 - Gradient glow
 rectangle frame
Magic wand - click inside the frame.
Selections - Modify - Expand 2
Copy a paper of choice (I used paper12) & Paste As New Layer.
Image - Resize 60%
Selections - Invert - Press the small delete key to remove excess paper.
Move this layer below the frame layer.
Copy your tube & Paste As New Layer.
(If you are using the same tube as me, I resized by 60%)
Layers - Duplicate (close off the duplicate for now)
Back on the original tube layer press the small delete key to remove any tube outside the frame.
Unhide the duplicate tube layer - move it so it's above the frame layer.
Eraser tool - erase the bottom of the tube so that it looks as if your tube is coming out of the frame.
flower
Selections - Select All - Float - Defloat
Copy a paper of choice (I used paper7) & Paste As New Layer.
Selections - Invert - Press the small delete key to remove paper outside the shape.
Selections - Select None
Delete the flower
Effects - Plugins - EyeCandy400 - Gradient glow
 Now go nuts lol add any elements you like.
I added
element 24 at 50%
element 33 - 60%
Add your copyright & Name.
Save as png or JPEG if you like a solid background.
Scrapkit called Have A Hoppy Easter by Teresa - download at
Creative Misfits Creations.
Tube of choice I'm using one called Brunnella by Bits N Bobs.
You must have a license to use this tube which you can purchase at PicsForDesign.
Mask RR_SpringEaster Mask5 - download from Creative Misfits Creations.
Font Gabrielle.
*****
Lets Get Started
Delete the copyright & background layers.
Image - Canvas Size 650x650.
New Raster Layer
Selections - Select All
Paste a paper of choice Into Selections (I used paper 8)
Selections - Select None
Layers - New Mask Layer - From Image
Layers - Merge - Merge Group.
scallope shape
Selections - Select All - Float - Defloat
Copy a paper of choice (I used paper10) & Paste As New Layer.
Selections - Invert - Press the small delete key to remove paper outside the shape.
Selections - Select None
Delete the scallope shape.
Effects - Plugins - EyeCandy400 - Gradient glow

Selections - Select All - Flaot - Defloat
Copy a paper of choice (I used paper11) & Paste As New Layer.
Selections - Invert - Press the small delete key to remove paper outside the shape.
Selections - Select None
Delete the thin rectangle layer.
Effects - Plugins - EyeCandy400 - Gradient glow

Magic wand - click inside the frame.
Selections - Modify - Expand 2
Copy a paper of choice (I used paper12) & Paste As New Layer.
Image - Resize 60%
Selections - Invert - Press the small delete key to remove excess paper.
Move this layer below the frame layer.
Copy your tube & Paste As New Layer.
(If you are using the same tube as me, I resized by 60%)
Layers - Duplicate (close off the duplicate for now)
Back on the original tube layer press the small delete key to remove any tube outside the frame.
Unhide the duplicate tube layer - move it so it's above the frame layer.
Eraser tool - erase the bottom of the tube so that it looks as if your tube is coming out of the frame.
flower
Selections - Select All - Float - Defloat
Copy a paper of choice (I used paper7) & Paste As New Layer.
Selections - Invert - Press the small delete key to remove paper outside the shape.
Selections - Select None
Delete the flower
Effects - Plugins - EyeCandy400 - Gradient glow

I added
element 24 at 50%
element 33 - 60%
Add your copyright & Name.
Save as png or JPEG if you like a solid background.
Subscribe to:
Posts
(Atom)
My Blinkie
I CT For