About Me

- ebilfairy
- Hi I'm Sandra (also go by ebilfairy) I'm 38. Living with my parents, younger sister, her daughter Bella and one dog called Kiki.
Sunday, 12 February 2012
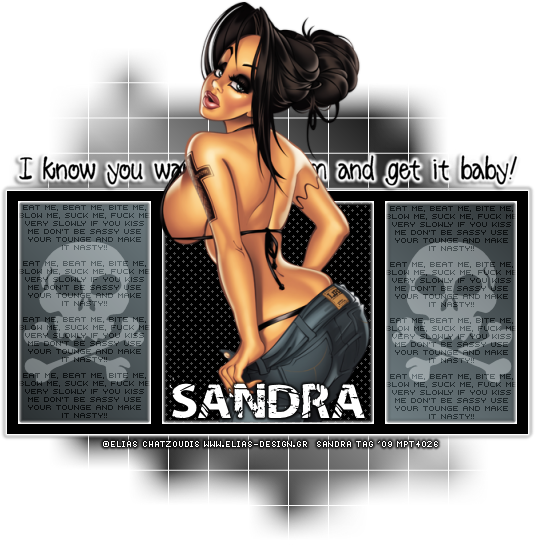
FTU Tutorial - I know You Want Me Baby
*Supplies*
Kristin - TD - Template 67
NeoTrash Font
Tube of choice I'm using the art of Elias Chatzoudis - you must have a license to use his art.
You can purchase the tubes at Elias Art Shop
(I bought my tubes while he was at PTE which has now closed)
*****
(I bought my tubes while he was at PTE which has now closed)
*****
*Let's Get Started*
Open template 67 in psp - press shift + D to duplicate - close off the original.
Delete - credits- stars - hearts - Words 2 - background
Image canvas size 600 x 600
Rectangles
Selections - select all - float - defloat
New raster layer - flood fill with the following gradient

Foreground #303638 - background #5d676c
Selections - select none
Square
Selections - select all - float - defloat
New raster layer - flood fill with #000000 (black)
Selections - select none.
Dots
Selections - select all - float - defloat
Flood fill with #ffffff
Selections - select none - lower the opacity to 50%
Frame
Effects - Eye candy 4000 - Gradient glow


Words3
Effects - Eye candy 4000 - Gradient glow
Same as before
Effects - 3D effects - drop shadow

Copy & paste your tube as a new layer
Place where you think it looks best
I resized mine by 80% smart size
Effects - 3D effects- drop shadow

Layers - merge - merge visible
New raster layer - flood fill with gradient we used at the beginning of the tut
Layers - new mask layer - from image
Find WSL_Mask84

Layers - merge- merge group
Layers - Arrange - send to the bottom
Add you name
I used NeoTrash size 36
I added a medium black gradient glow to make it stand out a bit more
Add your copyright - layers - merge- merge visible
Crop and resize to your liking.
Save as png or JPEG and we're done.
FTU Tutorial - NCIS

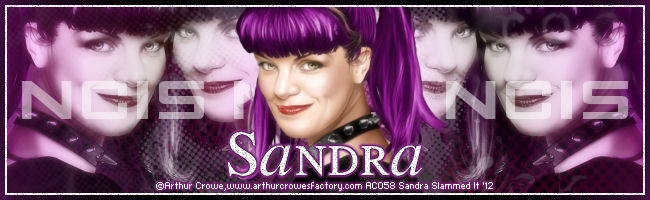
This tutorial was written by me on 12th of February 2012
*Supplies*
Tube of choice - I'm using the awesome work of Arthur Crowe. You must have a license to use his work.
The tube I've used is from his new store Arthur Crowes Factory
Texture of choice. I've used texture 5 from Vix PSP
Fonts GAMECUBEN and Will&Grace
Plugins
*Lets Get Started*
File - New - New Image 650x200
File - New - New Image 650x200
Make a gradient with 2 colors from your tube.
I used Foreground #000000 - Background #8c248b

Floodfill your canvas with the gradient.
Copy & paster your tube as a new layer - duplicate 4 times and position as shown

Once you have the tubes in position merge them all together.
Duplicate the tubes layer.
On the origional apply xero - radiance

Change the Blend mode to Luminance (Legacy)
On the duplicate tube layer - Adjust - Blur - Gaussizn Blur 3
Change the blend mode of the layer to Screen and lower the opacity to 60
Copy and paste Vix_Texture5 as a new layer (or whatever texture your using)
Change the blend mode to screen and lower the opacity to 24.
Now you can move it about until your happy with how it looks.
Activate your text tool. Font GAMECUBEN - size 36 - type out NCIS 3 times.
Objects - Align - Center in Canvas - lower the opacity to 50%
*Edit - Copy - Copy Merged.
Edit - Paste - Paste as New Image.
Leave for now.*
Back to your main canvas.
Copy and paste your tube - I resized 80% -Duplicate.
On the duplicate - Adjust - Blur - Gaussian Blur 3
Change the blend mode to Screen - lower the opacity to 62%
New Raster Layer - Floodfill with #ffffff
Selections - Select All - Selections - Modify - 7
Press the Small delete key on your keyboard or use your eraser tool to get rid of the excess white.
Adjust - Add/Remove Noise - Add Noise

New Raster Layer - Floodfill with you Gradient.
Selections - Select All - Selections - Modify - 5
Press the small delete key again.
Selections Select None.
Effects - Xero - Radiance - Same settings as before.
Add your name and copyright.
Save as JPEG
Avatar
New Canvas 100 x 165
Copy and paste the canvas we made earlier, as a new layer.
Move about until you have something you like showing.
Copy and paste your tube as a new layer - position and duplicate.
On the duplicate - Adjust - Blur - Gaussian Blur 3.
Change the blend mode to Screen and lower the opacity to 62
New Raster Layer - Floodfill with #ffffff
Selections - Select All - Selections - Modify - 7
Press the Small delete key on your keyboard or use your eraser tool to get rid of the excess white.
Adjust - Add/Remove Noise - Add Noise same as before.
New Raster Layer - Floodfill with you Gradient.
Selections - Select All - Selections - Modify - 5
Press the small delete key again.
Selections Select None.
Effects - Xero - Radiance - Same settings as before.
********
Here's the same tag in different colors.
Black


Red


Saturday, 15 October 2011
FTU tutorial - Gothic Halloween

This tutorial was written by me on 15th of October 2011
*Supplies*
Scrapkit by Kittz at KittzKreationz it's called Gothic Halloween
Tagtemplate416 by Missy at Divine Intentionz
Tube of choice. I'm using the awesome work of Ismael Rac
Font Lainie Day
*****
*Lets Get Going*
Open Missy template in PSP
Press Shift + D to duplicate it & close off the original.
Delete copyright, thin rectangle1 & 2, star1 & 2, frame, circle back & Copy of circle back.
Image - Canvas Size 750x500
square3
Selections - Select All - Float - Defloat.
Copy & paste paper GH-P8 as a new layer.
Image - Resize 70%
Selections - Invert - Press the small delete key on your keyboard.
Selections - Select None.
Delect square3
*****
*Lets Get Going*
Open Missy template in PSP
Press Shift + D to duplicate it & close off the original.
Delete copyright, thin rectangle1 & 2, star1 & 2, frame, circle back & Copy of circle back.
Image - Canvas Size 750x500
square3
Selections - Select All - Float - Defloat.
Copy & paste paper GH-P8 as a new layer.
Image - Resize 70%
Selections - Invert - Press the small delete key on your keyboard.
Selections - Select None.
Delect square3
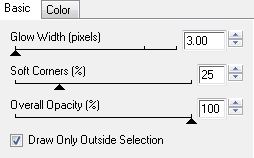
Effects - Eyecandy 4000 - Gradient Glow

square1
Selections - Select All - Float - Defloat.
Copy & paste paper GH-P4 as a new layer.
Image - Resize 70%
Selections - Invert - Press the small delete key on your keyboard.
Selections - Select None.
Delete square1
Effects - Eyecandy 4000 - Gradient Glow Same settings as before.
square2
Selections - Select All - Float - Defloat.
Copy & paste paper GH-P7 as a new layer.
Image - Resize 70%
Selections - Invert - Press the small delete key on your keyboard.
Selections - Select None.
Delete square2
Effects - Eyecandy 4000 - Gradient Glow Same settings as before.
rounded edge rectangle
Selections - Select All - Float - Defloat.
Copy & paste paper GH-P5 as a new layer.
Image - Resize 80%
Selections - Invert - Press the small delete key on your keyboard.
Selections - Select None.
Delete square2
Effects - Eyecandy 4000 - Gradient Glow Same settings as before.
rounded edge rectangle2
Adjust - Color Balance - Manual Color Correction
Source Color #fa66be - Target Color #bd0000
Effects - Texture Effects - Weave

Effects - Eyecandy 4000 - Gradient Glow Same settings as before.
circle center
Selections - Select All - Float - Defloat.
Copy & paste paper GH-P3 as a new layer.
Image - Resize 70%
Selections - Invert - Press the small delete key on your keyboard.
Selections - Select None.
Delete circle center
Effects - Eyecandy 4000 - Gradient Glow Same settings as before.
frame back
Selections - Select All - Float - Defloat.
Copy & paste paper GH-P6 as a new layer.
Selections - Invert - Press the small delete key on your keyboard.
Selections - Select None.
Delete frame back
Effects - Eyecandy 4000 - Gradient Glow Same settings as before.
circle right
Selections - Select All - Float - Defloat.
Copy & paste paper GH-P6 as a new layer.
Selections - Invert - Press the small delete key on your keyboard.
Copy & paste yoru close up as a new layer.
Change the blend mode to Luminance Legecy and lower the opacity to 64%
Selections - Select None.
Delete frame back
Effects - Eyecandy 4000 - Gradient Glow Same settings as before.
circle left
Selections - Select All - Float - Defloat.
Copy & paste paper GH-P6 as a new layer.
Selections - Invert - Press the small delete key on your keyboard.
Change the blend mode to Luminance Legecy and lower the opacity to 64%
Selections - Select None.
Delete circle left
Effects - Eyecandy 4000 - Gradient Glow Same settings as before.
Layers - Merge - Merge Visible.
Copy & paste your main tube as a new layer.
Add any elemenets you like I used.
GH-Star Ribbon
GH-Lights 90%
GH-Goth Swirl
GH-Cat 60%
GH-KITTY 50%
GH-Wizard Frog 50%
GH-Horned Pumpkin 50% then 90%
Resize tag to liking.
Add copyright and name.
Save as png for transparent background / jpeg for white background.
Subscribe to:
Posts
(Atom)
My Blinkie
I CT For