About Me

- ebilfairy
- Hi I'm Sandra (also go by ebilfairy) I'm 38. Living with my parents, younger sister, her daughter Bella and one dog called Kiki.
Tuesday, 26 March 2013
FTU Tutorial - Elegantly Cute Spring

This tutorial was written by me on 26th of March 2013 any resemblance to other tutorials is a coincidence.
*****
*Supplies*
Scrapkit Scrappin' Your ♥ Out Blog Train the part I'm using is from
Irish Princess Designs called Elegant Spring here.
Tube of choice - I'm using an adorable tube by Zlata_M. You must have a license to use this tube.
Purchase it at PicsForDesign here.
Mask3 from Lexi here.
Font of choice - I used 2Peas Mister Giggles.
*****
*Lets Get Started*
Open a new blank canvas 650x650
Floodfill with a #7ba62c - Layers - New Mask Layer - From Image.

Layers - Merge - Merge Visible.
Copy IPD_ES_Frame1 - Paste As New Layer.
Image - Resize 70% smartsize.
Copy IPD_ES_Frame2 - Paste As New Layer.
Image - Resize 80% smartsize.
Copy IPD_ES_Tree - Paste As New Layer.
Image - Resize 90% smartsize.
Move to the left of the frame.
Copy IPD_ES_Grass - Paste As New Layer.
Effects - Image Effects - Offset

Copy IPD_ES_Log - Paste As New Layer.
Image - Resize 60% smartsize.
Move to the bottom of the frame.
Copy IPD_ES_Plant - Paste As New Layer.
Image - Resize 30% smartsize.
Move to the left of the log.
Copy IPD_ES_GrassNRock - Paste As New Layer.
Image - Resize 50% smartsize.
Move to the right of the log.
Copy your tube - Paste As New Layer.
(If your using the same tube as me I resize 65% smartsize.)
Layers - Duplicate
Layers - Arrange - Send to Bottom.
Layers - Arrange - Move Up.
Back on your original tube layer.
Selection Tool - Custom Selection

Press the small delete key.
Selections - Select None.
(Or just use your eraser Tool - it's up to you)
Add your copyright & name.
Save as png.
**2016 Result**

Monday, 18 March 2013
FTU Tutorial - Hoppy Easter

This tutorial was written by me on 18th of March 2013 any resemblance to other tutorials is a coincidence.
*****
*Supplies*
Scrapkit by Vaybs called Easter 2010
Tube of choice I'm using one called Brunnella by Bits N Bobs.
You must have a license to use this tube which you can purchase at PicsForDesign.
RR_SpringEaster Mask5 here
Font of choice I used Good Vibrations
*****
*Lets Get Started*
Open a new blank canvas 650x650
Floodfill with a color of choice I used #fad058
Layers New Mask Layer - From Image
Find RR_SpringEaster Mask5 in the dropdown box
Layers - Merge - Merge Group
Copy DBV Easter 2010 element (17) & Paste As A New Layer
Image - Resize 90%
Copy DBV Easter 2010 element (18) & Paste As New Layer
Copy DBV Easter 2010 frame (3) & Paste As New Layer
Image - Resize 80% smartsize
Magic Wand Tool - Click inside the frame - Selections - Modify - Expand 5
Copy DBV Easter 2010 paper (5) & Paste As New Layer
Selections - Invert - Press the small delete key.
Copy your close up tube - Press the small delete key
Selections - Select None
Duplicate the tube layer.
On the original tube - change the blend mode to Luminance(Legacy)
On the duplicate tube layer - Adjust - Blur - Gaussian Blur 3
Change the blend mode to Screen - Lower the opacity to 80%
Hide Mask - element (17) & element (18) layers
Layers - Merge - Merge Visible.
Image - Roate - Free Rotate Left 20
Effects - Image Effects - Offset

Effects - Image Effects - Offset

Copy DBV Easter 2010 element (15) & Paste As New Layer
Image - Resize 60% smartsize
Effects - Image Effects - Offset
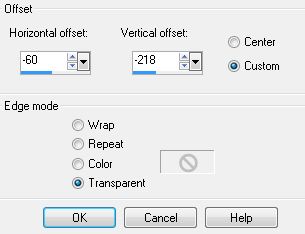
Layers - Duplicate
Effects - Image Effects - Offset

Copy DBV Easter 2010 element (4) & Paste As A New Layer
Image - Resize 60% smartsize
Effects - Image Effects - Offset

Copy your tube & Paste As A New Layer
Resize to your liking & Move where you think it looks best.
Unhide Mask - element (17) & element (18) layers
Add copyright & your name.
Layers - Merge - merge Visible
Sunday, 17 March 2013
FTU Tutorial - Brattitude

This tutorial was written by me on 17th of March 2013 any resemblance to other tutorials is a coincidence.
*****
*Supplies*
DBV Misfit template02 by Vaybs
Scrapkit Brattitude by Vaybs
Mask 107 by Vaybs
Tube of choice I'm using one called Daniella by Bits N Bobs.
You must have a license to use this tube which you can purchase at PicsForDesign.
Tube of choice I'm using one called Daniella by Bits N Bobs.
You must have a license to use this tube which you can purchase at PicsForDesign.
*****
*Lets Get Started*
Open template in PSP - press shift + D to duplicate it - close off original.
Image - Resize 90%

Image - Canvas size 650x650
Delete Raster 11
Raster 1
Selections - Select All
Layers - New Raster Layer
Copy DBV Brattitude paper (3) & Paste Into Selection
Selections - Select None
Layers - Arrange - Send to Bottom
Layers - New Mask Layer - From Image

Layers - Merge - Merge Group
Layers - Duplicate - Image - Mirror - Image - Flip
(close off for now)
Copy of Raster 9
Layers - Merge - Merge Down
Selections - Select All - Float - Defloat
Copy DBV Brattitude paper (15) - Paste As New Layer
Selections - Invert - Press the small delete key
Selections - Select None
Delete the original layer
Copy of Raster 10
Layers - Merge - Merge Down
Selections - Select All - Float - Defloat
Copy DBV Brattitude paper (17) - Paste As New Layer
Selections - Invert - Press the small delete key
Selections - Select None
Delete the original layer
Copy of Raster 4
Layers - Merge - Merge Down
Selections - Select All - Float - Defloat
Copy DBV Brattitude paper (17) - Paste As New Layer
Selections - Invert - Press the small delete key
Selections - Select None
Delete the original layer
Raster 5
Selections - Select All - Float - Defloat
Copy your close up tube & Paste As New Layer
Selections - Invert - Press the delete key
Selections - Select None
Duplicate the tube layer
Change the blend mode of the original tube layer to Luminance(Legacy)
On the duplicate tube layer
Adjust - Blur - Gaussian Blur 3
Change the blend mode to Overlay - Lower the opacity to 70%
Copy of Raster 5
Selections - Select All - Float - Defloat
Mirror your close up tube - Copy & Paste As New Layer
Selections - Invert - Press the delete key
Selections - Select None
Duplicate the tube layer
Change the blend mode of the original tube layer to Luminance(Legacy)
On the duplicate tube layer
Adjust - Blur - Gaussian Blur 3
Change the blend mode to Overlay - Lower the opacity to 70%
Raster 7
Selections - Select All - Float - Defloat
New Raster Layer
Floodfill with a gradient
Foreground #f5afcb
Background #8ab2bc

Delete Raster 7
Raster 8
Adjust - Color Balance - Manual Color Correction
Source #000000
Target #ffffff
Copy of Raster 7
Selections - Select All - Float - Defloat
New Raster Layer
Floodfill with a gradient (same as before but switch foreground & background)
Foreground #8ab2bc
Background #f5afcb
Delete Copy of Raster 7
Copy of Raster 7
Adjust - Color Balance - Manual Color Correction
Source #000000
Target #ffffff
Raster 3
Selections - Select All - Float - Defloat
Copy DBV Brattitude paper & Paste As New Layer
Selections - Invert - Press the small delete key
Selections - Select None
dotted circle
Copy your tube & Paste As New Layer
Add dropshadow of choice.
Raster 2
Adjust - Add/Remove Noise - Add Noise

Add Elements of Choice
I used
DBV Brattitude element (42) resize 80%
DBV Brattitude element (28) resize 50%
DBV Brattitude element (31) resize 60%
DBV Brattitude element (9) resize 40%
Open up your mask layers & move around to your liking (or delete it's up to you)
Add copyright & name
Layers - Merge - Merge Visible
Save as png.
Subscribe to:
Posts
(Atom)
My Blinkie
I CT For