About Me

- ebilfairy
- Hi I'm Sandra (also go by ebilfairy) I'm 38. Living with my parents, younger sister, her daughter Bella and one dog called Kiki.
Monday, 13 February 2012
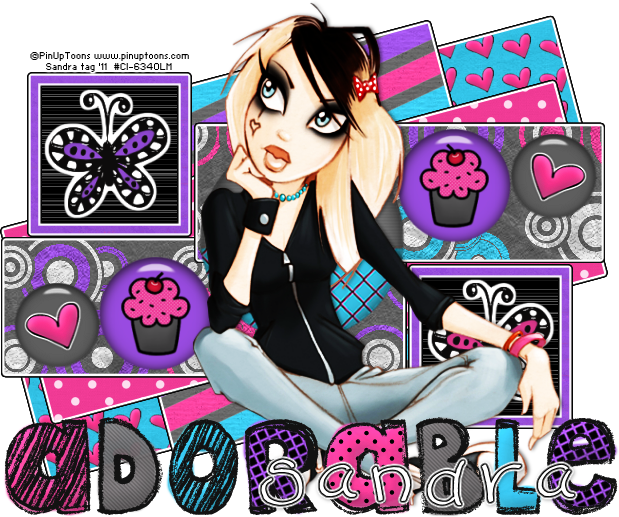
FTU Tutorial - Adorable
Supplies
Tube of choice I'm using a PinUp Toons which you can buy at Creative Design Outlet
Scrapkit Follow my Heart, you can download it at Sweetness Expressions
Template 411 by Missy at Divine Intentionz
Font 2Peas Permanent Wave
*
Plugin
Plugin
Eyecandy400 - Gradient Glow
*****
Lets Get Started
Open the template in PSP
Press Shift + D to duplicate the template and close off the original.
Image canvas size 650 x 550 - Delete the background, center star and credit layer.
square
Selections - select all - float - defloat.
Copy & paste paper 7 as a new layer
Image - Resize 70%
Move so that it's over the square
Selections - Invert - Press the small delete key on your keyboard.
Selections - select none.
Delete the origional square2 layer.
Effects - Plugins - Eyecandy 4000 - Gradient Glow


square2
Selections - select all - float - defloat.
Copy & paste paper 7 as a new layer
Image - Resize 70%
Move so that it's over the square
Selections - Invert - Press the small delete key on your keyboard.
Selections - select none.
Delete the origional square2 layer.
Effects - Plugins - Eyecandy 4000 - Gradient Glow same settings as before.
center square
Selections - select all - float - defloat.
Copy & paste paper 6 as a new layer
Image - Resize 70%
Selections - Invert - Press the small delete key on your keyboard.
Selections - select none.
Delete the origional square2 layer.
Effects - Plugins - Eyecandy 4000 - Gradient Glow same settings as before.
rectangle
Selections - select all - float - defloat.
Layers - New Raster layer
Open paper 5
Image resize - 40% smartsize
Activate your floodfill tool - in Material Properties find Paper 5 in your drop down box.

Floodfill your new layer.
Selections - select none.
Effects - Plugins - Eyecandy 4000 - Gradient Glow same settings as before.
rectangle left
Selections - select all - float - defloat.
Copy & paste paper 8 as a new layer
Move it around until you have something you like showing inside the martching ants.
Selections - Invert - Press the small delete key on your keyboard.
Selections - select none.
Delete the origional square2 layer.
Effects - Plugins - Eyecandy 4000 - Gradient Glow same settings as before.
rectangle right
Selections - select all - float - defloat.
Copy & paste paper 8 as a new layer
Move it around until you have something you like showing inside the martching ants.
Selections - Invert - Press the small delete key on your keyboard.
Selections - select none.
Delete the origional square2 layer.
frame left
Selections - select all - float - defloat.
Copy & paste paper 4 as a new layer.
Image - resize 70%
Selections - Invert - Press the small delete key on your keyboard.
Selections - select none.
Delete the origional square2 layer.
Effects - Plugins - Eyecandy 4000 - Gradient Glow same settings as before.
frame right
Selections - select all - float - defloat.
Copy & paste paper 4 as a new layer.
Image - resize 70%
Selections - Invert - Press the small delete key on your keyboard.
Selections - select none.
Delete the origional square2 layer.
Effects - Plugins - Eyecandy 4000 - Gradient Glow same settings as before.
frame back left
Adjust - Color Balance - Manual Color Correction

Effects - Plugins - Richard Rosenman - Scanlines.

Copy & paste Sticker1 as a new layer
Image - resize - 80% smartsize
frame back right
Adjust - Color Balance - Manual Color Correction - same settings as before.
Effects - Plugins - Richard Rosenman - Scanlines - same settings as before
Copy & paste Sticker2 as a new layer
Image - resize - 80% smartsize
circles
Copy & paste BRAD 2 as a new layer
Image - resize 50% smartsize - move over the small circle
Layers - duplicate - Image - Mirror and move over the other small circle.
Copy & paste BRAD 1 as a new layer.
Image - resize 70% smartize - move over the medium circle.
Layers - duplicate - Image - Mirror and move it over the other medium circle.
Copy & paste BRAD 3 as a new layer.
Image - resize 130% smartsize and move over the middle circle.
Delete the circles layer.
Layers - merge - merge visible.
Layers - duplicate - change the blend mode to Multiply and lower the opacity to 69%
Layers - merge - merge visible.
Copy 7 paste your tube as a new layer - position where you want.
Layers - duplicate - adjust blur - gaussian blur 3
Change the blend mode to Soft Light
Copy & paste WORDART as a new layer.
Layers - duplicate - change the blend mode to Multiply - lower the opacity to 75
Add your name and copyright.
Layers - merge - merge visible and save as Png.
Subscribe to:
Post Comments
(Atom)
My Blinkie

I CT For


0 comments:
Post a Comment