About Me

- ebilfairy
- Hi I'm Sandra (also go by ebilfairy) I'm 38. Living with my parents, younger sister, her daughter Bella and one dog called Kiki.
Monday, 13 February 2012
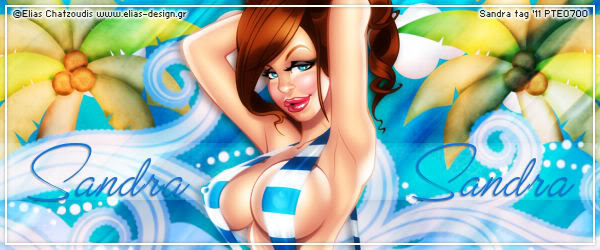
FTU Tutorial - Summer Wave

Supplies
I'm using a kit from Seachell's Sacrpz called Splish Splash.
(Kit is unfortunately no longer available)
(Kit is unfortunately no longer available)
Tube of choice - I'm using one by Elias Chatzouids.
You must have a license to use his art. You can purchase his tubes at Elias Art Shop
(I bought my tubes while he was at PTE which has now closed)
(I bought my tubes while he was at PTE which has now closed)
Font Valentina JF
Filters
Muras Meister Copies
*****
Lets Get Started
Open a new canvas 600x250
Copy & paste paper 2 as a new layer.
Copy & paste element 23 as a new layer - resize 70%e -place near the top of the canvas.
Copy & paste element 38 as a new layer - resize 40% - move to the left of your canvas.
Layers - duplicate - Image - mirror - layers - merge - merge visible.
Copy & paste element 20 as a new layer - resize 65% - move to the bottom of your canvas.
Copy & paste your tube as a new layer - effects - MuRas miester - Copies.
 Adjust - Blur - Motion Blur
 Change the blend mode to overlay.
Preset shape - retangle and draw out a rectangle 600x50 - move near the bottom of your canvas - change the blend mode to soft light.
Copy & paste your tube again and place where you think it looks best.
Layers duplicate - adjust - blur - gaussian blur 3 change the blend mode to overlay.
Add a drop shadow to your bottom tube

Layers - New raster layer - layers - arrange bring to top.
Selections - select all - selections - modify - contract by 5 - flood fill with white (or a color from your tube)
Selections - modify - contract 2 - press the small delete key on your keyboard - drop shadow.
Add your name and copyright.
Layers - merge - merge all flatten.
Save as JPEG.
Avatar
New canvas 150 x 150
Copy and paste your tag as a new layer - Image mirror.
Move about until you have something you like showing.
Layers - New raster layer.
Selections - select all - selections modify - contract 5 - flood fill with white.
Selections - modify - contract 2 - press the small delete key and you should have a frame.
Add your name and copyright - save as JPEG.
**Update 2016**
This is my result for the tut using a kit called Popsicle Smiles by Sheila at DigiTee.
And here is the cluod I made cos there is none in the kit.


**Update 2016**
This is my result for the tut using a kit called Popsicle Smiles by Sheila at DigiTee.
And here is the cluod I made cos there is none in the kit.
Subscribe to:
Post Comments
(Atom)
My Blinkie

I CT For


0 comments:
Post a Comment